
What
You Need to Get Started A PPP account from your Internet Service Provider (for example METU), as well as the following information: Once you have this information, you're ready to proceed to step 1. Step 1: Verify that Dial-up Networking is Installed Press the Step 2: Verify that the Dial-up Adapter and TCP/IP Protocol are Installed Press the
![]() button, select Settings..., then Control Panel. Double-click the
Add/Remove Programs icon. Select the Windows Setup tab, then click on the Communications
option and press Details.... Make sure that the Dial-up Networking
option is selected. If it is, go on to step 2. If it isn't, select it and click
OK. Windows 95 will attempt to install the needed drivers, so make sure you've
got your installation disks or CD handy! Now that Dial-up Networking is installed,
you can proceed to step 2.
button, select Settings..., then Control Panel. Double-click the
Add/Remove Programs icon. Select the Windows Setup tab, then click on the Communications
option and press Details.... Make sure that the Dial-up Networking
option is selected. If it is, go on to step 2. If it isn't, select it and click
OK. Windows 95 will attempt to install the needed drivers, so make sure you've
got your installation disks or CD handy! Now that Dial-up Networking is installed,
you can proceed to step 2.![]() button, select Settings..., then Control Panel. Double-click
the Network icon. You'll see a dialog box Figure 1. Make sure the Configuration
tab is selected. Both Dial-Up Adapter and TCP/IP should be present
(like in the picture), then you're ready to proceed to step 3.
button, select Settings..., then Control Panel. Double-click
the Network icon. You'll see a dialog box Figure 1. Make sure the Configuration
tab is selected. Both Dial-Up Adapter and TCP/IP should be present
(like in the picture), then you're ready to proceed to step 3.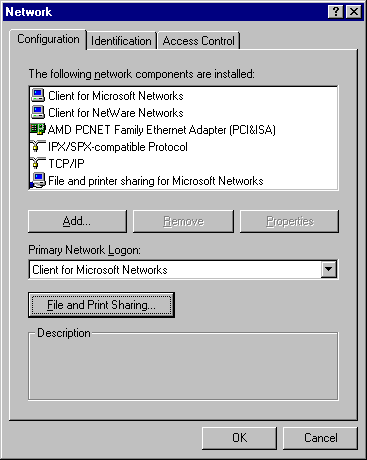
Figure 1: Network dialog box. To add the Dial-Up Adapter, hit the Add... button, double-click Adapter, then scroll down the list until you can select Microsoft. Choose the Dial-Up Adapter and hit OK.
If you need to install TCP/IP, hit the Add... button, double-click Protocol, then select Microsoft, then TCP/IP, and hit OK.
Bindings
By default, the Client for Microsoft Networks option is checked. Leave it alone.
Advanced
No changes needed are from the default.
DNS Configuration
This is probably what has been giving you the most trouble. Select the Enable DNS option. This stands for Domain Name Service. Enter your user name in the Host box. In the Domain, put in the name of your provider, like cc.metu.edu.tr for all METU students
In the DNS Server Search Order section, put in the IP address of your provider's name server and press the Add button. To find this number, you can log into your provider with a Windows terminal and type nslookup. Your provider's server will return the DNS address. For METU type 144.122.199.20 and 144.122.1.101 with order.
If you were previously using Trumpet Winsock, the DNS is the Name server value in the Trumpet Winsock Setup dialog box.
In the Domain Suffix Search Order section, type in the domain suffix (usually the same as the domain) and press the Add button. If you were using Trumpet Winsock, this is the Domain Suffix value in the Trumpet Winsock Setup dialog box. Again for METU type cc.metu.edu.tr, net.tr, and metu.edu.tr in order.
When you're all done setting these options, press the OK button. Then press the OK button in the Network dialog box. Windows 95 will ask you to reboot. Press Yes.
Step 5: Set up the Connection Icon
Open up My Computer from the desktop and double-click the Dial-Up Networking icon. Double-click the Make New Connection icon. This will walk you through the Make New Connection wizard. The first dialog box looks like this.
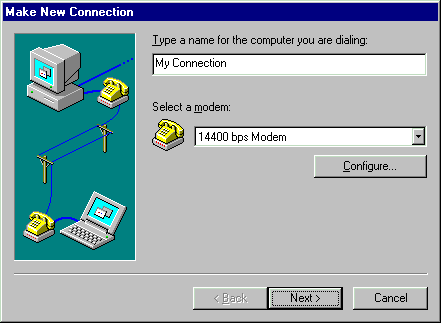
Figure 4: Make New Connection
Type in "PPP Internet Access", "Internet Connection", or whatever you want to call the icon you're about to create to connect you to your provider (the title won't affect the type of connection). Your modem (which should have been configured when you installed Windows 95) should be shown in the Select a modem: box. Press the Configure button and you'll get a dialog box that looks like Figure 3.
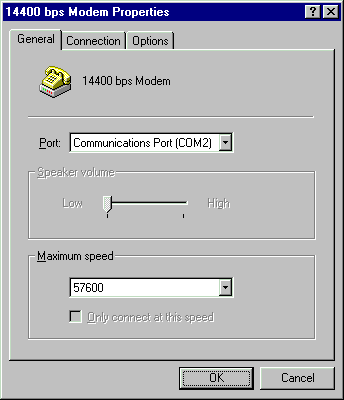
Figure 5: Modem Properties
In the General section, Crank up your modem speed to as fast as you think it will go. If you have a 14.4K modem, for example, make the maximum speed 57600. DO NOT, however, select Only connect at this speed. This will let your modem adjust as the connection needs. Don't worry about the Connection section, the defaults should be fine. Next, select the Options section. Depending on how your provider handles login, there are a couple of ways to configure this dialog. Try checking the Bring up terminal window after dialing box, Now hit the OK button. Click the Next > button in the Make New Connection wizard. Enter in the phone number (2101040 for students and 2104300 for academics) of your access provider. You don't need to put in an area code if it's a local call.
Press the Finish button and your icon will be created. Your Dial-Up Networking folder should now look something like the following picture.
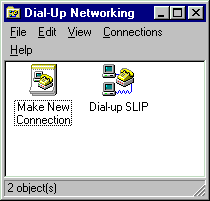
Figure 6: All the needed steps finished Step 6: Dialing in and Getting Connected Double-click your session icon that you recently set up. You'll get the Connect To dialog box Press the Connect button and your modem should start dialing. After a few rings, your provider's host machine should answer. If you check the Bring up terminal window after dialing option, enter your user name and press ENTER. Then enter your password and press ENTER. Depending on your provider, your screen may look different, or may ask for the type of connection you wish to make. You can type PPP if that is the case (for METU, this is enough). If you're not sure, check with your provider. If you get some garbled characters after entering your connection information, ignore it - it won't affect the connection. Press F7 or click the Continue (F7) button. You are ready to start your favorite Netscape or Internet Explorer navigator to start.
Source: http://www.windows95.com